This blog post may contain affiliate links.
play ideas
Showing posts with label play ideas. Show all posts
Tuesday, September 1, 2020

Creepy Crawly Halloween Sensory Play Tray

We love sensory play here and make sensory trays for pretty much any theme, including Halloween. This creepy crawly Halloween sensory play tray is a great way for toddlers and preschoolers to join in the Halloween fun without getting too scared. They can scoop, pour, touch, feel and investigate minibeasts and creepy crawlies until their heart's content.

child investigating bugs, bats and rats in halloween sensory rice

Friday, August 7, 2020

Turtle Life Cycle Small World Play Tray

This sea turtle small world is a great hands on way to teach turtle life cycles to young children and is also a fun sensory experience exploring the texture and feel of sand and water. It's a fun way to explore science either in the classroom, or at home.
turtle life cycle small world invitation to play in a tray

Some children learn best by reading information, however my children definitely learn best hands on through play, so I introduced the life cycle of a turtle using a small world play tray with animal figurines. 

I find my children definitely learn and absorb so much information by being able to touch and manipulate figurines while playing. They're also big sensory seekers so anything with a sensory element is a big win, which is why we love small world play so much!
Monday, July 20, 2020

Pom Pom Heuristic Play Tray for Toddlers

Are you looking for a quick, low prep activity to keep your toddler entertained? In this post I'll show you how to put together a quick heuristic play tray using pom poms, utensils and recyclables that's sure to keep your toddler intrigued and entertained.

toddler playing with pom poms and cups in a tray
Monday, March 30, 2020

Green Tree Frog Life Cycle Pond Small World

When my big girl started prep last year they did an awesome unit on butterflies where they got caterpillar eggs and kept them in their classroom. The kids got to watch them go through the life cycle all the way to butterflies and it was a great hands on way for them to learn about life cycles. After they did that I started thinking about creative ways I could teach other animal life cycles at home {without actually keeping live animals}.

I found the Safari Ltd life cycle of a frog figurine set and knew I could easily turn that into a fun small world for the girls. A frog life cycle small world was a great way to physically show them the life cycle of frogs in a hand on way, without having to actually keep or touch {eww}, real tadpoles and frogs.
Green tree frog life cycle small world tray
Tuesday, March 3, 2020

18 Colour Sorting Activities for toddlers

Learning colours is one of the earliest cognitive skills children develop and it provides a foundation for learning math, science and language skills later in life. Although children can physically see colour from a young age, most start learning to recognise and differentiate between different colours between 18 months and 3 years of age. The toddler years are the perfect time to start actively teaching colours to your children and they should be reinforced until they start school.

There are many opportunities to introduce children to specific colours in every day life, simply through observation. For example: Look at that red car over there... Look the light has turned red... The red man means stop... Do you want to wear your red shoes today? Using language and repetition will help toddlers learn and make distinctions between colours.

If you want to expand on these naturally occurring opportunities each day then you can try setting up specific colour sorting activities. Below are 18 different hands on colour sorting activities I did with my girls when they were toddlers.


SIMPLE BEGINNER COLOUR SORTING ACTIVITIES FOR TODDLERS


These beginner colour sorting activities are great for toddlers starting to figure out the connection between two or more items being the same colour. For beginner colour sorting activities I would start with one single colour and then move onto two and more as they recognise more individual colours. I personally focus on introducing primary colours first.


The very first colour activity I always do when introducing the concept of colours is a colour discovery basket. I pick various items of the same colour and put them together in a basket then leave it on the shelf for them to discover at their own pace. 

To fill the basket I usually use a mixture of toys we already have like megabloks, duplo, sensory balls, bristle blocks and small wooden toys. Most of our baskets are thrift shop funds, but you can also find cheap ones at Kmart or dollar stores.

The discovery basket is more about giving them an opportunity to realise all the objects are alike in colour, even though individually they're different sizes and textures. Sometimes I add in a corresponding flashcard as well. 

This activity can also be adapted for older children to a colour treasure hunt where they go and collect items of the same colour and put them together in the basket themselves.


Another simple way to initiate colour sorting is with a set of colour flashcards. We use the Two Little Ducklings colour & shape flashcards as they can be used to match colours, shapes and objects so they've been quite versatile as the girls got older. I initially start out with colour matching just the three primary colours so it's not too overwhelming. Also I was totally stoked that we actually had the three items in the correct colours to match the cards for these {it's the small things that make my OCD happy}.


Colour sorting a single object by colour is another really simple colour sorting activity. The girls loved colour sorting our grimms threading buttons. We even had fun creating different colour sorted pictures with them.


A nature colour sort is an extra fun way to colour sort because the kids get to go on a nature hunt first. Head outside with a basket and collect colourful nature items like leaves and flowers and then bring them inside and sort them. We used our colour board from Works at Play, but you could also use coloured containers or even lay them on coloured pieces of paper.


Another really simple way to sort with a colour board {or sheets of coloured paper} is to colour sort coloured blocks. We used our coloured nature gems because they're dyed with the same natural paints as our colour board, however you could use any coloured blocks like Lego, megabloks or duplo {just be mindful of the size if your child is still mouthing}.


COLOUR SORTING WITH CONTAINERS


Using coloured containers makes it easier for toddlers to start sorting a number of different colours into specific areas by giving them a colour coordinated defined space. This is particularly useful for toddlers who are in the enclosure/container play schema and love transferring and filling up containers. Many different items can be used as containers for colour sorting.


Colour sorting loose parts into coloured bowls is an activity my daughter still regularly requests. When we first did it I collected 5 loose parts in each primary colour and put them into a basket with three coloured bowls set up in front. 

For our loose parts I used peg dolls, magnetic tiles, plugging flowers, megabloks and bear counters, but you can use any loose parts you have, just be mindful if they're still mouthing and always use loose parts under supervision.


This house colour sort using magnetic tiles and peg dolls combined my daughter's two favourite toys at the time so it was a huge hit. I set up the coloured houses and then put the peg dolls out with no instructions and she automatically colour sorted them to the matching houses. 

Our houses are all different shapes and sizes because we only had a small set of magnetic tiles at the time, so I was limited to certain shapes in certain colours. If you have a larger set of tiles you could make the houses all the same shape.


The Grimms rainbow is great for colour sorting other smaller objects. I made this colour spiral with the rainbow and gave my big girl a basket of smaller toys in different colours. She sorted them all into the correct colour arch. For this one we only used 6 of the 12 pieces, however there are other rainbow colour sorting and stacking ideas in my Grimms rainbow play ideas post.


The girls colour sorted grimms friends and pom poms using grapat rings as a guide. Even though they're made by different brands, the grimms friends colours match up really well with the grapat rings and they fit perfectly inside. We also happened to have some pom poms which almost perfectly matched some of our grapat rings too.


Colour sorting buttons into containers was one of my big girls favourite activities. These coloured shape buttons were part of a board game we owned and I teamed them up with some matching paint cups and tweezers. You can get similar buttons from Amazon here.


SENSORY COLOUR SORTIING ACTIVITIES


With almost all play activities we do, I love to add sensory elements to make things a little more interesting, and colour sorting is no exception. The following activities are three different sensory colour sorts we've done in the past. Each activity uses a different sensory base to add some textural stimulation to the colour sort.


Colour sorting dyed pasta is a fun way to add a sensory element to colour sorting. I dyed our pasta with food colouring and vinegar and this particular batch lasted a few years {just keep it stored in a ziplock bag}. I simply presented it in a big bowl with small coloured IKEA bowls for her to sort {these are the older version of the IKEA kids bowls from a few years ago}.


Colour sorting letters from sensory rice into paint pots was another really fun way to add a sensory element to colour sorting. I partially buried the letters in the rainbow rice and she had to find them and sort them into the coloured paint pots. 

I added in plastic tweezers for some bonus fine motor practice, but wasn't worried if she didn't use them. This same activity could be done with coloured shapes, numbers or magnetic chips.


I did this playdough colour sorting activity when my daughter was 18 months old. She loved playdough {still does} and really wanted to play with her big sister's linking plastic discs so I combined them into a really quick colour sort. I limited it to only 2 colours so it wasn't too overwhelming {and also because I can't handle having multiple colours of playdough opened at once}.

To be honest as the time I thought it'd just become a free for all mess of playdough, but she actually colour sorted them. Then picked them back out, put them in the bowl and sorted them again 3 more times. She made a few mistakes, but self corrected before she actually stuck the discs into the dough. She also pretended to do some wrong just so she could say "uh oh nah dat one, over dere" 


FINE MOTOR COLOUR SORTING IDEAS


Once toddlers get a bit older and have more control over their fine motor movements, for example they can open and close tongs and grasp small objects in their fingers, then you can start to add fine motor elements to colour sorting to help build up those fine motor skills. My favourite way to do this is by adding items like tweezers or tongs, but we've also tried some other out of the box ideas.


For this fine motor colour matching geoboard invitation we used an IKEA plate stand, some hairbands and Melanie Shanks peg dolls. Baby girl carefully threaded the hairbands over 2 pieces of dowel to make colour houses and then matched the peg people with the right house. 

This was also great for building up her hand muscles as she had to work hard to stretch the bands over the dowel sticks and then stretch them open to slide the peg dolls inside. The Ikea plate stand is one of our favourite Ikea items for the playroom.


The idea of this egg carton colour sorting invitation is that the child uses the plastic tweezers to pick up and transfer the pom poms into the corresponding colour in the egg carton which is a great workout for their fine motor skills. To make it I coloured each section of the bottom of an egg carton with alternating felt pens and found matching pom poms. I made it with four different colours and three of each one so it wasn't too overwhelming.


A while ago Kmart released a wooden money box for $7 and I knew I had to have it straight away. My girls were still a fair way off learning actual money values, but I knew it had great potential to be hacked into a sorting box. 

To create this kmart colour sorting box hack I simply turned the backing board around and put different coloured dot stickers above each section. I then gave my daughter some coloured paddle pop sticks so she could colour match them to the correct compartment. This activity was extra tricky because the slot to stick them through is quite narrow so they had to be maneuvered just right to fit.


With the same hacked kmart money box the girls sorted our plugging flowers. This is great for pincer grip practice as well as they have to grab them quite tight to get them through the money box slot. We also counted them as we sorted them.


This jelly colour sort was an activity both my toddler and 4yr old enjoyed together. To make it I mixed some gelatine and water and filled the four compartments of a dip tray, then added a few drops of food colouring to each one and let it set in the fridge. Once it was all set I added coloured toothpicks to the centre and the girls pushed them into the corresponding jelly. 

This was a great activity for working on pincer grip and hand strengthening as they pushed the toothpicks into the jelly sections. Be mindful it does get quite messy though! We did it outside and once they'd finished colour sorting it turned into sensory play squishing and mixing all the jelly.


Disclosure - This post contains some affiliate links which means I may earn a small commission, at no extra cost to you, should you make a purchase.
Saturday, February 29, 2020

Animal Habitat Playdough Sort and Rescue Activity

Playdough is one of my favourite sensory materials to use with kids {and not going to lie, I love to play with it myself}. It's such a wonderful sensory experience {and fine motor workout} squishing, rolling, squeezing and splatting playdough between your fingers. Apart from it's tactile benefits, it can also be used in a number of educational ways to teach children other skills. 

I created this animal habitat sort and rescue activity for my daughter using playdough and animal figurines. One quick and easy to set up activity provided so many different learning opportunities and then she even extended on it herself.


ANIMAL HABITAT PLAYDOUGH SORT AND RESCUE INVITATION TO PLAY


< Please note this activity is not recommended for children under 3 as some items may pose a choking risk. Full adult supervision is required >


LEARNING OPPORTUNITIES

- Colour recognition
- Animal names & habitats
- Categorising {by habitat}
- Hand/eye coordination
- Hand strengthening
- Problem solving
- Pincer grip


*This post contains some affiliate links*


WHAT YOU WILL NEED

- Mini animal figurines
- Playdough {blue & green}
- Wooden tray {2 compartments}
- Tongs or plastic tweezers

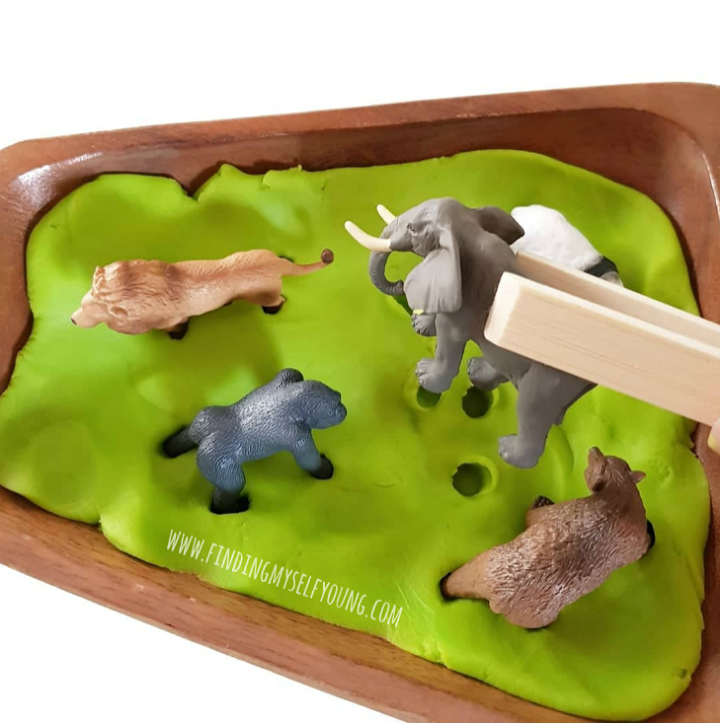
I set up the habitat sorting activity in a two compartment monkey pod tray so that there would be one side for the land animals and one side for the sea animals. Having blue playdough in one side and green playdough in the other makes it really easy for kids to visually differentiate between the two different habitats. 

I have a huge collection of monkey pod trays I've thrifted, so I pretty much have a tray for every activity, but any two compartment tray would work fine for this invitation to play.

For the animals I used some of our mini wild animals and some of our mini sea animals. Our animal figurines are CollectA brand, but you can also get similar mini figurines from Wild Republic and Safari toobs. I added some wooden tongs for some fine motor practice, you can usually find these at thrift stores, dollar stores or online at Amazon for a few dollars {plastic tweezers are also a great alternative}.


When I first set up this activity it was as an animal rescue activity to practice her fine motor skills, so I set it up with the animals already stuck in the playdough, instead of making her sort them to begin with. I deliberately put land animals on the green playdough and sea animals on the blue playdough for some added categorisation, but didn't mention it to her because I wanted to see how she'd naturally interact with it. 

My only "rule" for the activity was that she had to use the tongs to remove the animals not her fingers {which she loves doing anyway, she even went and got a second bigger pair of wooden tongs to add to my set up}.


She rescued the animals from the playdough and then studied the footprints and imprints left in the dough. She repeatedly put the animals back into the playdough {on the correct habitat colours} and rescued them for about five minutes. She then asked me to play with her and created new games for me to play.

She put the animals in the playdough and deliberately mixed them up in the wrong habitat and told me I had to rescue them and put them in the right habitat. Then she did it again but put some of them in the right sides and some in the wrong habitat and told me I had to rescue the ones in the wrong habitat {I love that she tried to trick me and had no idea she was actually reinforcing her own learning}. 

After that she took all the animals out and told me I had to put them all back in, but I had to use tongs to push them into the playdough, no fingers allowed {like a reverse of what she did}.


I seriously love how she extended on the original activity and then tried to teach and quiz me! When the student becomes the teacher as they say. This was such a great activity for the learning opportunities mentioned above, but also because of the quality time we spent together bonding over a shared interest. If you click on the Instagram post below you can go through to the videos at the end to watch part of our play. 


Disclosure - This post contains some affiliate links which means I may earn a small commission, at no extra cost to you, should you make a purchase.
Wednesday, February 26, 2020

Chicken Playdough Tray Invitation to Play

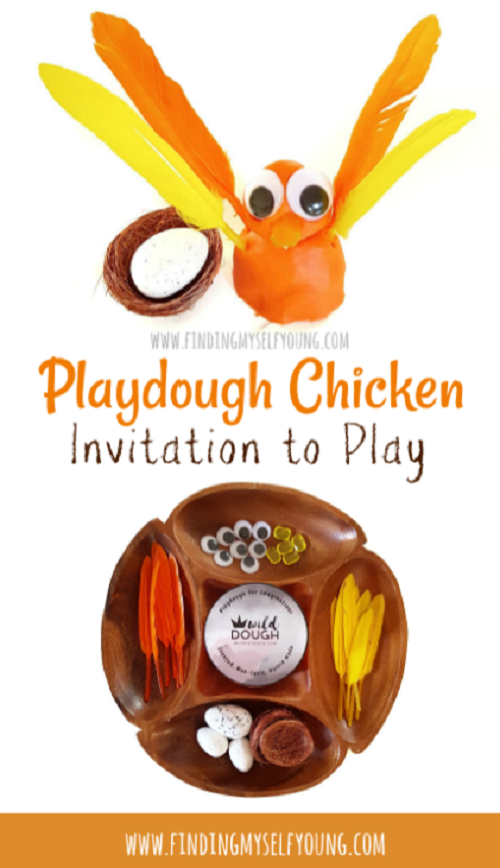
One of my favourite activities to do with younger kids is a playdough tray invitation to play. They're one of the first activities I set up with my girls from a young age and they're so much fun to do together. I love that they combine loose parts with sensory play, so they get heaps of sensory input with lots of opportunities to work on their fine motor skills. I love setting up themed playdough trays and seeing what the girls come up with. The fun part is they could play with the same items over and over, and each time they'll come up with different results.

This invitation to build a playdough chicken is great as an Easter craft activity, but also great for any time of the year. We made these after my daughter's kindy kept live chickens for a few weeks so the kids could learn how chickens hatched and watch them grow. There was lots of pleading for us to get our own chickens during those weeks, but we can't have real ones at our place, so we made some playdough ones instead. 

This would also be a great classroom activity for preps or kindy students to do while learning about farm animals, studying the chicken life cycle or in the lead up to Easter {even though the Easter bunny gets all the credit for the eggs at Easter}.

*This post contains some affiliate links*

<< Please note this activity is intended to be done under strict adult supervision >>

WHAT YOU WILL NEED


- A monkey pod tray or dip tray
- Yellow or orange playdough
- Craft feathers
- Googly eyes
- Acrylic gems
- Mini nests
- Mini eggs


I set our playdough tray up in my favourite monkey pod dip tray because it's the perfect shape to have playdough in the middle and the loose parts separated around the outside. Our monkey pod tray was a lucky op shop find, but you can find a similar wooden compartment tray online here. You could also use a plastic dip tray which can be found at most supermarkets and dollar stores, however they will crack over time. 

When we made these playdough chickens we used orange playdough and yellow gems, because that's what we had on hand at the time, however I would of preferred to use yellow playdough and orange gems {for the beak} to make them look more realistic. Playdough, acrylic gems, googly eyes and craft feathers are relatively easy to track down at dollar stores all year round. Mini nests and mini foam eggs are usually available at dollar stores in the lead up to Easter {I just buy in bulk so I always have some}, however they're available year round online from Etsy or Amazon.


The best part about a tinker tray style playdough invitation to play is that although there's generally a goal, in this case to build a chicken, there's no right or wrong way for kids to reach that end goal. In fact they don't even have to do what we as adults intended the activity to be. I like to think of tinker trays as the process art version of the play world, because it's more about the fun had throughout the process of playing rather than the outcome. This activity could also easily be turned into a bookish play idea by reading That's Not My Chick before playing.


We played alongside each other building our own chickens and although we started with exactly the same materials, we ended up making completely different chickens. I was really surprised because I thought she would naturally build a 3D chicken like I did, but then she made a 2D version. Even though I nicknamed it roadkill chicken {not out loud}, I actually kind of love it, because it's just another reminder of how kids see the world differently to adults.


Disclosure - this post contains some affiliate links which means I may earn a small commission, at no extra cost to you, should you make a purchase.
Friday, February 14, 2020

Jelly Boy Bookish Play: Environmental Ocean Small World Sensory Tray

I've always been passionate about the environment and like to think that I do my bit to reduce our waste and footprint on our planet. I'm not a full on eco-warrior by any means, but I do make sure we recycle everything possible. Not to mention the four hundred and twenty two art projects we've made from hoarding rubbish and recyclables to reuse {not even joking, my garage is full of bubble wrap, boxes, toilet paper rolls, bottle lids, magazines, newspapers etc}. 

I'm hoping that my efforts rub off on my girls and they become environmentally conscious too. Now that they're getting older I'm finding more obvious ways of teaching them about the environment and my favourite way to do this is through play. We recently received a copy of Jelly-Boy and set up some small world bookish play after reading the story.

jelly boy small world tray.
Monday, January 16, 2017

Must Have Materials for Sensory Play

If you follow me on Instagram you'll be well aware of my love of sensory play. We're constantly using food items, water, craft bits and pieces, left over packaging and basically anything we can get our hands on for sensory play. 

There's a plethora of items available for sensory play, you just need to know where to look, so this week I've invited my friend Casey from Little Lifelong Learners, who has many years experience as a teacher and a stay at home mum to two little ones, to share her favourite must have materials for sensory play.

sensory bottles.