This blog post may contain affiliate links.
review
Showing posts with label review. Show all posts
Thursday, August 20, 2020

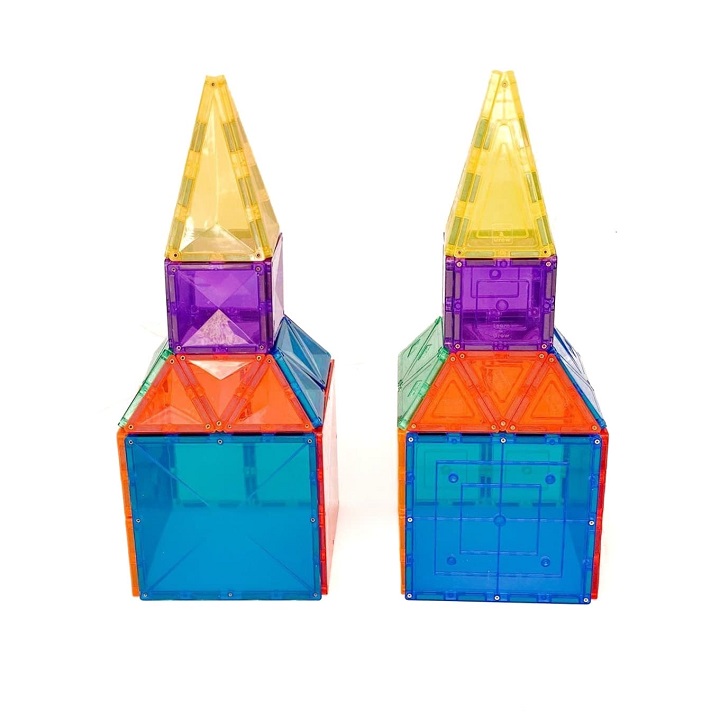
Learn & Grow vs Connetix: Which Magnetic Tile Brand is Best?

Are you wanting to add some awesome open ended magnetic tiles to your playroom or classroom, but you don't know which brand is best? Don't worry I've done the hard work for you and compared some of the leading magnetic tile brands so you can make an informed choice about which set is perfect for you. In this post I'll compare the size, strength, quality and value for money of Connetix and Learn & Grow magnetic tiles

connetix and learn and grow tiles side by side

Magnetic tiles are what I call a unicorn toy, because quite frankly they tick all of the boxes. They're a completely open ended resource, they can become anything your child imagines and there's no wrong way to play with them. You can stack them, create with them, count them, colour sort them and use them on multiple surfaces, along with many other play ideas

They're also a stem toy, so they help teach children science, technology, engineering and mathematical concepts through play. While playing children will be using their fine and gross motor skills, improving hand/eye co-ordination, hypothesising and problem solving as well as exploring many other developmental skills. And perhaps the best benefit of all, for those who have multiple children, is that they're great for children of all ages, toddlers, preschoolers and school kids all love getting creative with magnetic tiles.
Tuesday, March 26, 2019

Dig, Dump, Roll Construction Sensory Play

Ever since I was really little I've always had an innate love of books and reading, so it's no surprise that my children have developed their own love of reading at a young age too. It's probably directly related to the number of children's books we have all over the house. 

You can never have too many right? Unless you ask their dad, he definitely thinks we have too many... and yet I keep finding even more to add to our collection {sorry, not sorry}. Our latest addition is Dig, Dump, Roll by Sally Sutton.

Dig, Dump, Roll is the follow-up to the wildly popular picture book Roadworks. In this book Sally Sutton uses interactive, rhyming text to entice children to guess what kind of vehicle is at work on each page. Bright cropped illustrations work alongside the descriptive text to give further clues before all is revealed over the page.

Crash-a-rumble Smash-a-grumble 
What’s at work? 
Here’s a clue: It will clear the ground for you. 

Bulldozer! Coming through! 

My 5yr old can't read herself yet, but she very much enjoyed the descriptive text {it's entirely possible I'm a little too enthusiastic when reading aloud} and guessing what would come next. To my surprise she was very quick to guess the final surprise, but then she admitted to me they'd read this book before at kindy {cheater!}. Clearly that proves that it's a book kids love to read over and over, even when they somewhat remember what comes next. 

Dig, Dump, Roll has been selected for the prestigious 2019 Storylines Notable Book List. Since 1999 Storylines has produced an annual list of outstanding books for children and young people published in New Zealand by New Zealand authors and illustrators during the previous calendar year. The annual list of Notable Books ensures that children, parents, grandparents, teachers, librarians and the public are all made aware of the large range of high quality New Zealand books being published.


DIG, DUMP, ROLL -  SENSORY BOOKISH PLAY


After we finished reading the book together I brought out a little small world bookish play activity I'd prepared while she was at school. Bookish play is a general term for any play based activity that is centered around a particular book. Its a great way to extend the story or main theme of a book beyond the pages and onto the craft table or into the playroom. 

With its descriptive, interactive text, Dig, Dump, Roll is the perfect starting point for some messy, fun, construction themed sensory bookish play. Of course I went with a cutlery tray construction small world because the girls love sensory play and small worlds, so it was a no brainer. If your children are younger you could try this simpler construction alphabet sensory bin.

Dig dump roll bookish play activity using a cutlery tray.

<<< Please note this activity poses a choking risk to children under 3yrs of age due to small parts. This activity is intended for children aged 3+ and to be done under strict adult supervision >>>

SUPPLIES YOU'LL NEED


~ A cutlery tray {we use an Ikea one}
~ Construction vehicles {ours are from Kmart}
~ Construction loose parts {rocks, sticks}
~ Sensory construction bases {chickpeas, blackbeans}
~ Chocolate or brown playdough
~ Chocolate dirt {recipe further below}
~ Wooden letters


 LEARNING OPPORTUNITIES


- Hypothesising {how do the machines work, how can we build with each material}
- Categorising types of construction materials
- Sensory input {touch, smell and taste}
- Hand strengthening {squishing the sensory materials}
- Pincer grip practice {picking up the beans and chickpeas}
- Hand/eye co-ordination
- Language development
- Sight word practice
- Letter recognition
- Imaginary play


If you've been following me on Instagram for a while, you'll know I love using cutlery trays as a base for small world play {search #cutlerytrayplay for some of my other play ideas}. They're particularly perfect for scenes that use many different sensory bases as each compartment contains the individual bases so they don't mix together {until the kids get to it anyway}. The tray slots are also great for defining separate play spaces like animal enclosures for a zoo, or in this case different construction zones. I love the Ikea cutlery trays because they're plastic and can be used with wet or dry materials.

Dig Dump Roll sensory bookish play tray
Construction bookish play sensory bases
Edible chocolate dirt sensory base.


I deliberately chose sensory bases that would all be taste safe, just in case my 1yr old was awake when we did this activity and she wanted to explore it as well. While I never encourage the girls to eat any of the sensory materials I put out for play, I know with a mouthing toddler it's inevitable that it could happen, so I'd rather use items that won't cause harm if accidentally ingested. 

I chose beans, chickpeas, edible dirt and playdough specifically because they all work in well size and texture wise with the construction vehicles I paired them with. I included the rocks and sticks because this set up was for my 5yr old, however if I intended to do it with both girls I would remove the rocks and sticks to be safe.

We've lived with fake grass for years now so my kids have never really had the chance to play with real dirt or mud. I substitute mud by making chocolate oobleck, but until now I've never had a substitute for dirt. This week I decided to try and make a chocolate edible dirt version. 

EDIBLE CHOCOLATE DIRT RECIPE


1 cup flour
1/3 cup chocolate powder
1/8 cup canola oil

Mix dry ingredients together in a bowl with a spoon and add oil slowly until it resembles a crumbly dirt consistency. Squeeze mixture with hands, it should hold its shape under pressure, similar to kinetic sand. Add more oil sparingly if required.

For our chocolate flavouring and dirt colour I simply used chocolate powder sachets that I've been keeping for sensory play. You could also use cocoa powder, drinking chocolate or Milo. Just insure your chocolate element is powder based so the cloud dough mixes properly. You can adjust the recipe amounts based on how much you need, just ensure you keep an 8:1 ratio of flour to oil.

Dig Dump Roll book and bookish play tray activity

I added in our small wooden letters to spell out the title of the book, with hints from the vehicles, for some bonus word recognition for my daughter. After we read the book together I brought out the tray and at first she sounded out the words trying to figure out what they were. She got dig and dump relatively easy and needed a little bit of help with roll. I think she did pretty well considering they haven't started on sight words yet at school and they haven't finished learning all the letter sounds.

She then drove all the letters around in the different vehicles which was great incidental letter recognition. Eventually her play moved on from re-enacting the story to planting the chickpeas into the dirt and using the sticks as plants that sprouted from the seeds. I love how bookish play uses a story as a springboard that leads to all sorts of other imaginary play. An added bonus of this particular activity is that the aroma of chocolate was ah-mazing.

MORE BOOKISH PLAY IDEAS


Disclosure - We were kindly gifted a copy of Dig, Dump, Roll from Walker Books for the purpose of review. All other products featured within this post are part of our personal sensory play resources and were previously purchased by myself.

*This post contains some affiliate links for your convenience, which means I may earn a small commission at no extra cost to you, should you make a purchase.
Monday, January 14, 2019

Back to School with Smiggle

In just over 2 weeks my biggest baby is starting school.

* Insert all the "I don't know how this happened, she was just a baby" clichés here *

Truth is both her and I are more than ready. She had to wait an extra year as she missed the age cut off here in QLD and I think that extra year has well and truly helped us both prepare for the separation anxiety that's to come. In fact I think we're more emotionally prepared than practically prepared. It's been the monumental list of things I've needed to buy/get ready that's been stressing me out the most, not the fact that I'll miss her everyday {although I will miss her of course}.

We're lucky because our school seems pretty laid back when it comes to all the "things" they need. They can have whatever backpack, drink bottle, lunchbox etc that we as parents see fit to get them. Which for the most part is amazing, because nobody wants to be dictated to, but it also meant as a first time school mum to be {that's totally a term} I really had no idea where to look for school stuff. There's been a lot of frantic Facebook statuses asking for advice and trips to the shops where I get so overwhelmed I just panic and walk out. So, when I got an email in my inbox telling me about the Smiggle back to school range of products and asking if I wanted some samples I couldn't say yes please quick enough!


SMIGGLE BACK TO SCHOOL SUPPLIES


When I think of Smiggle I automatically think of cool stationary and accessories, but to be honest they weren't even on my radar for other school supplies. I didn't even realise they stocked things like drink bottles, lunchboxes or backpacks. I'm sure there's other time poor mums out there like me that didn't know this either so I thought I'd share some of the range here. Please note the images I've used are totally bias because I have a girl, but rest assured they do have plenty of options for boys too.

LUNCHBOXES


Smiggle has a comprehensive range of lunchboxes available including snack jars, square lunchboxes, super popular bento styles and double decker ones. The double decker ones {far left in the image below} have plenty of room for a traditional lunchbox in the bottom and an ice brick or fruit/snacks in the top. The cool thing about the Smiggle lunchboxes is most of them can be coordinated with matching drink bottles, backpacks and in some cases stationary too. Lunch containers range from $9.95 to $39.95.


DRINK BOTTLES


Smiggle have drink bottles for junior preppies right through to the mega thirst option for big {water} drinkers. They all contain straws which can be removed if your child prefers to drink without one. Drink bottles range from $12.95 to $26.95.


BACKPACKS


Smiggle has a big range of school bags including drawstring bags {great for library bags or to store swimming gear/spare clothes}, book bags, character backpacks and traditional backpacks in numerous designs. We already had a backpack organised, but if we were getting one from Smiggle bub would pick the faves backpack in pink {below} as it matches her lunchbox and drink bottle. School bags range from $17.95 through to $64.95.


STATIONARY & ACCESSORIES


The one part of school supply shopping that I've been looking forward to for years is the stationary. Pretty pens, highlighters, notebooks, accessories, tapes, erasers etc get me way more excited than they should, and as far as I'm concerned you can never have too many. However, all my hopes and dreams of going overboard shopping for stationary were dashed when our school announced they have a system where we all pay a set fee and the school buys all the stationary supplies needed in bulk. I mean it's saved me lots of time and probably money, but part of me is mourning all the trips I could of made and all the cute stationary we could have bought. Alas it wasn't meant to be, but we can have super cute stuff for home. She has to do her homework with something...

Smiggle have you covered with basic stationary supplies with notebooks, pens, pencils, staplers, pencil cases, scissors and rulers available in different colours and designs. There's also novelty erasers, sharpeners, pens and pencil toppers. In addition to the basics, they also have cool accessories like keyrings, watches, alarm clocks and lights. See the full range of Smiggle back to school stationary here.


\

Disclosure - I was sent a Smiggle lunchbox, drink bottle and pen sets for the purpose of  review. I did not receive payment for this post. All stock photos have been used with permission. 
Monday, December 11, 2017

Pop the Pig game review

One of the things I've been looking forward to most as bub's been getting older is introducing her to board games. I have fond memories playing board games with family as a child and I want to create my own family traditions, starting with buying a new game as a joint Christmas present each year. I'm excited that at 4 and a half she's finally getting old enough to understand simple games, obviously we won't be playing monopoly any time soon, but her attention span is finally at a point where we can enter the world of family game nights {or afternoons}.

But where do you start with kids games? There's just so many out there. And how do you know which ones they'll like? This is where technology has actually been helpful. A few weeks ago she started obsessing over youtube videos of Pop the Pig. She watched videos of other kids and reviewers playing the game over and over again. Gone are the days of watching unboxing and surprise egg videos on repeat a thousand times, now it's all about kids reviewing games. 

The fact that she kept watching Pop the Pig in particular piqued my interest. At first I thought it was only available in America {because most of the videos she found were American}, but then I started seeing it in shops here, so it went straight onto our Christmas list. As luck would have it an opportunity came up to review it so I said yes straight away because we were going to get it anyway.


Pop the Pig is a multiplayer game designed for kids aged 4+ You feed the pig burgers until he gets so full his stomach pops! The game comes with 16 individual burgers; 4 green, 4 purple, 4 yellow and 4 red. Players roll the dice to determine which colour burger to feed the pig. Each burger then has a number on the back and once you feed the pig you press down on his chef's hat the corresponding number of times. The game continues until the pigs stomach pops, his belt flings open and his arms go up in the air. 


Pop the Pig arrived on a kindy day so bub didn't even know we had it, but it took her about 4.5 seconds to spot it once we walked in the door. I had this whole spiel planned, but she spied it while I was literally still closing the front door. So the big reveal I had rehearsed in my head didn't quite go as planned, but she was super surprised none the less. As soon as she spotted it she started jumping up and down on the spot unable to contain her excitement. She swung back and forth between "mummy look it's the pig off the youtube" to being completely speechless to "mummy and daddy thankyou sooo much for the pig, it's the best". Safe to say she liked it before we even opened it up. We then spent all afternoon {and every day since} playing Pop the Pig at least 3 times in a row, sometimes multiple times a day.


I love that the instructions are so simple as she only has to roll the dice and press the head the corresponding number of times. It's been a great way to introduce her to games and concepts like turn taking, waiting and rolling a dice, without adding in any other complicated rules. She's getting much better at waiting her turn, but she's usually so excited she rolls the dice before we've finished pressing the chef's hat, sometimes patience is not her virtue. And even though the rules are super easy, it hasn't stopped her sometimes trying to cheat, if it gets near the end of the game and she rolls a colour she doesn't want she tries to change the colour, or tell us that was our roll not hers. For the most part though she plays by the rules and there haven't been any tantrums yet {which says a lot}. 

As players can roll any colour in any order and each colour can have different numbers each time, no game is ever the same, so it's always a surprise when the pig's going to pop and who's going to be the winner. Which is great because she hasn't got bored with it at all, despite the fact we've already played it 20+ times in 5 days. She's even played it by herself a few times when I've been busy feeding her sister and she finds it just as exciting and suspenseful on her own, despite the fact she's obviously going to be the winner.

On the surface the game may seem super simple and just a lot of fun, which it is, but it's also got a lot of learning thrown in too. While playing kids are learning to recognise, name and differentiate between colours when rolling the dice and picking a burger. They're also recognising numbers when feeding the pig and also learning to count while pressing the pigs head. The more they play, the more these skills are reinforced. 


In addition to this its also helping kids develop fine motor skills by using their pincer grip picking up the pieces, hand/eye co-ordination to put the burgers into the mouth and hand strengthening when pushing down the head. These are all skills that will help them once they go to school. Bub currently uses two hands to push the head down as she's not quite strong enough to do it with one, but I'm sure over time she'll eventually be able to do it one handed.


I love that Pop the Pig isn't a traditional board game, but rather a combination of a toy and educational game in one. It's a great way to introduce young children to games with purposeful actions and outcomes {as opposed to free playing with toys} and it's fun for the whole family, not just the kids. I'm well over 4 and I get just as excited as bub does waiting for it to pop. Even though I'm generally not a big fan of anything plastic, I'm loving this game and all the learning that's happening each time she plays {and the best part is there's no need for batteries so it'll never stop working}.

Pop the Pig is available at all leading toy stores as well as Amazon US, Amazon AU and Catch. For more about Pop the Pig and other great toy reviews visit Talkin Toys.

Will you have any games under your Christmas tree this year?

Toni x


Disclosure - This is a sponsored review as per my disclosure policy for Talkin Toys. I chose Pop the Pig to review as we were planning on purchasing it already.

Monday, October 30, 2017

VTech Sleepy Glow Bear Review

If you've been following along on my Facebook or Instagram accounts lately you're probably aware of our sleep troubles with baby girl. To put it bluntly she's never slept well {not unless she's attached to me}. This has been the case since day 1, the night she was born the midwives made me co-sleep because she refused to settle without me. After she came home we tried rocking, shushing, patting, boobing, using a dummy as a replacement boob, the bassinet and the cot, but most nights I'd resort to co-sleeping from sheer exhaustion. There's only so many hours you can rock and shush a baby while functioning on no sleep, at some point it becomes more dangerous being upright holding a tiny human while delirious than it is sleeping together. So that's what we did, until I got to the point I thought my baby was just broken and I took her to sleep school.

When we got home from sleep school things were going great, for about 3 days, and then things started slowly deteriorating until we were back at square one. As luck would have it when things started going pear shaped {again} the Sleepy Glow Bear arrived on my doorstep for baby girl. To be honest when I agreed to review it a few weeks before I didn't even realise it was a sleep aid {shows you how sleep deprived I was}, I simply thought it was an interactive bear toy. So, when it arrived smack bang in the middle of sleep regression hell I was pretty excited! Even though sleep school hadn't really helped {it did while there, just not at home}, I was cautiously optimistic the sleepy glow bear would give us some reprieve, after-all sleep aids were one thing we hadn't actually tried and it couldn't really get any worse.

The Sleepy Glow Bear is a soft and cuddly sleep aid designed to be used from birth. It combines a soft glowing night light, white noise & music options with a soft squishy body for gentle visual, auditory and tactile stimulation to help soothe babies off to sleep. The bear has 3 different touch buttons on his belly that either play loving phrases, sing-a-long songs, white noise or nature sounds {there's more than 70 different sound options}. The volume, light intensity and length of play time can all be adjusted via the control panel inside the bear.

When we first started using the sleepy glow bear I introduced it during day naps because I wanted to test out her reaction to it without further upsetting night time sleep {or lack thereof}. Because it was day time I initially used the bear without the night light option and set the volume as low as possible. I also used the bear in the top corner of her cot as far away from her as possible because she was only 5 months old and I'm paranoid about SIDS. After a few days of figuring out which noise she liked the most {for us it's the first nature sound option} it actually worked really well for day naps. She soon learnt her song and being in the cot meant it was time for sleep and she'd fall asleep with minimal fuss. Hallelujah.


After about 2 weeks of day naps with the sleepy glow bear I decided to introduce it at night time as well since she'd formed a sleep association with it. We also added the night light option on low as she seems to like a bit of soft lighting as she falls asleep at night. For some reason at night she needed to be rocked to sleep while listening to the bear, rather than falling asleep on her own in the cot. Using the bear on low volume, 30 minute timer and low glow night light worked well at night time getting her to sleep, but unfortunately it didn't help her stay asleep during the night {although to be honest I haven't found anything that helps her sleep longer than 2-3hrs}.

I love that the bear has so many different sound options, so you're pretty much guaranteed there'll be one your baby will like. For us the first nature tune is always a winner at bed time and she also likes the first melody from the heart button {but just when playing, not at sleep time}. I love that there's a timer which can be set for demo, 15 min or 30 min, for us 30 minutes was the best option, but other babies may fall asleep fine within 15 minutes. The only limitations I've found is that you can't go through the sound options without continuously pressing the button and working your way through each sound, so if your baby likes the fifth sound you need to press the button 5 times, you can't just pick that tune. It hasn't really been an issue for us though as she loves the first tune anyway. The only other way I think it could be improved is if there was an option to have the sound continuously playing, which may help keep babies asleep longer.

If you have a non sleeping baby like mine and you're looking for a sleep aid I'd definitely recommend giving the sleepy glow bear a try, even though it doesn't help her sleep for longer periods of time, it's definitely helped her go off to sleep which was half our battle. It's also a lot cheaper than other white noise/sleep aid toys on the market so it's a smaller outlay and it can still be used as a cuddly toy if on the off chance it doesn't improve your bub's sleep. Babies are fickle little creatures and what works is constantly changing {especially with every developmental leap, teething etc} so at the moment mine has decided she'll no longer sleep in the cot and prefers to be with me again, but we still use the sleepy glow bear when falling asleep at night {and it's actually quite effective at putting me to sleep too}.

Sleepy Glow Bear is $29.95 and available from Kmart and selected toy retailers. For more information visit www.vtech.com.au or follow VTech on facebook or instagram. To read more VTech toy reviews click here.

Toni x


Disclosure - I received a sleepy glow bear from VTech Toys for the purpose of review. All opinions expressed are based on our experience using the bear. I did not receive payment for this review.
Tuesday, September 5, 2017

Puzzle play

Puzzles are such a staple toy in any kids life, I dare say nearly every child is likely to play with a puzzle at some point throughout their childhood. We started off with really simple peg puzzles here and have progressed our way through letter puzzles, number puzzles, colour matching puzzles, shape puzzles, animal puzzles, chunky puzzles, floor puzzles and now more intricate smaller puzzles. 

I love how they challenge her cognitively, helping increase her concentration skills, each time she plays for a bit longer before getting frustrated. She's also practicing her problem solving skills as she works out where each piece should go while simultaneously developing her hand/eye co-ordination and fine motor skills as she places each piece into the correct spot. The best part is she's doing this all while she's playing without even realising she's actually learning at the same time. They really are a great resource for learning through play.

At four years old bub's mastered many different types of puzzles, but by far her favourite ones are still chunky puzzles with a 3d element. However, she quickly gets bored playing with them traditionally, especially once she's put them together a few times and has memorised where all of the pieces go. Did you know there are many other ways to play with puzzles other than just putting the pieces into the correct spot?

Once bub gets bored with doing puzzles the conventional way we think outside the box and come up with other ways to make them interesting again. In the past we've wrapped pieces in alfoil, searched for pieces in sensory tubs and made our own DIY puzzles by tracing the outlines on a piece of paper and matching them up. She loves all of these activities and especially loves the open ended play experiences where we're not strictly matching the pieces onto the puzzle.

We've recently taken our puzzle play a step further again thanks to the most awesome open ended puzzle I've ever come across from Happy Go Ducky.


Happy Go Ducky is a unique online toy shop run by a husband and wife team stocking quality traditional wooden, tin and crochet toys. They have puzzles, animal stackers, wooden vehicles, tin vehicles, crochet animals and many other items available for babies through to young children. All of the unique European brands they stock are ethically designed and handmade in the Czech Republic using sustainable, non-toxic materials by artisans who've been designing toys for decades. 

Happy Go Ducky stock toys that are likely to be held onto and passed down through generations as family heirlooms. Think push along wooden elephants, wooden trains and retro tin cars. They're bringing the nostalgia of yesteryear to modern day children and helping to keep traditional toy making alive. I'm so thrilled that we get to have one of their beautiful Playful Wood puzzles in our home which I'll most definitely be holding onto and passing down to bub for her children in the future.
The extra large wooden 3D spiral puzzle includes 16 different coloured wedges and a wooden circle that together create a large multicoloured circle. It also comes with wooden dowel pieces and a wooden ball which help bring the puzzle to life in so many fun ways. It's no secret that I have an enormous love of wooden educational toys, you only have to take a quick look around our play area to see that. I love the tactile experience that comes with wooden toys and I love thinking out of the box when it comes to playing with toys, so when a toy hits the trifecta and is educational, wooden and versatile I get a little bit excited.

When we first opened the puzzle bub immediately declared it was her "pizza puzzle" because of its circle shape and wedged pieces. It may not look like much to the untrained eye, but this puzzle is a colour wheel come 3D puzzle come building blocks come marble run marvel. Basically every kids {big kids included} dream puzzle. Let me show you all the different ways we've been playing with our pizza puzzle over the last few weeks.

Colour Wheel 


The most obvious and basic way to use it is as a colour wheel. Kids can arrange the colours in any order they like as there's no colour guide on the base plate, which means they're only limited by their imagination {and best of all there's no right or wrong way to put it together}. Being extremely OCD I prefer it to be arranged in colour order from light to dark {purely because it makes my heart happy}, but it's become apparent my child isn't always bound by the same logic. Even though it hurts my brain a little when she places the colours haphazardly, it's fun for her knowing there's endless ways to arrange all the pieces.


Making Pictures


The pieces can also be arranged to create different shapes and items. We've used ours to copy some of the images on the puzzle product page as a guide, her favourite one to make is the man, but there are so many more possibilities. I plan on drawing some coloured images and laminating them as guide cards for her to use.


Building Blocks


With chunky pieces the puzzle easily doubles as a set of coloured building blocks. She's stacked them on top of each other to make towers, laid them flat to make pathways and balanced them to create bridges and doors.


Ball run {straight or curved}


We quickly discovered that the dowel and ball can be used in many different ways to make our pizza puzzle even more awesome. When the wedges are placed upside down {so they have 2 holes in each piece showing} they can be placed either straight or curved to make a pathway. We then add dowel into all the outside holes and it transforms the pathway into a ball run. This one keeps her entertained for quite a while as she has to think strategically about how and where to lay the pieces in order to make the pathway. It also works her fine motor skills pushing the dowel pieces into place.

Wheel Of Fortune


Normally the puzzle pieces sit on the base plate with only the middle holes visible {as in the first picture above}, but she worked out if we put them in upside down so both holes are to the top and the dowel is in it creates a circular ball rink. She loves spinning the ball around and around the circle and trying to get it to run out the gaps. I affectionately call this set up the wheel of fortune because it's all I can think of when I look at it. I just want to spin it around, take off a piece and reveal the $ value underneath {yes I'm that old, I still miss that show!}. She likes to call it a skating rink because the ball goes round and round like ice skating.


Staircase Drop


Without a doubt our most favourite way to play with the pizza puzzle is to turn it into a staircase ball drop. Stacking the pieces around the central pole and using the little dowel pieces on the outside edges transforms the puzzle into a spiral staircase. The dowel pieces also make it the ultimate ball run allowing the ball to drop down each step without falling off {although if your child is a little over zealous like mine it can still bounce off when pushed too hard}. I can seriously play with it like this just as long as she can, it's so much fun. She's also now able to set it up and put all the pieces in place herself because we've done it so often.


As you can see this puzzle can be played with a multitude of different ways on top of being a traditional colour wheel puzzle and I'm sure there's even more ways we're yet to discover. I love that there are so many open ended ways to play with it and that also means bub never gets bored of it, which is exactly what you want when buying toys. I can see this puzzle is going to be a family favourite for many years to come.

Toni x

Disclosure - We were gifted a wooden spiral puzzle for the purpose of review. All opinions expressed in this post are based on our experience using the puzzle. I did not receive payment for this post.

Linking with Kylie
Thursday, August 10, 2017

Scooting along with Globber

Bringing a second baby into a family is a time of upheaval and uncertainty for a family unit, especially for the older child who's going from single child status to big brother or sister. With this in mind we decided, before I was due, that we'd make a concerted effort to spend one on one time with bub so she didn't have such a drastic change from only child to having to share us all the time. 

Coincidentally, a couple of weeks before I gave birth I was asked if we wanted to try out the new Globber MyFREE Fold UP scooter and it couldn't have come at a more perfect time. The scooter not only gives bub something special that's only for her, but it's also given us a fun activity that we can do with her during our special one on one time.

Please note this scooter has been upgraded and renamed as the Globber Primo foldable

The Globber MyFREE Fold Up is designed for 3yrs +  with an adjustable handlebar to grow with the child until a max of 50kg. It's a step up from her first Globber scooter as it's a standing only scooter without a seat attachment. She was also lucky enough to receive one with flashing LED wheels and I'm actually slightly jealous that it's hers and not mine {is that wrong?}.

As a toddler bub took quite a while to master her Globber My Free 4 in 1 scooter in the actual scooter mode, so I expected she might be a bit hesitant with the MyFREE Fold Up, but to my surprise she had it down pat within about 15 minutes. It was like watching her morph from a toddler into a big girl right in front of me. I guess having a baby makes older children suddenly look more grown up as well, but seriously watching your firstborn baby suddenly able to tackle a scooter without any help is another subtle reminder that they are in fact growing up whether you like it or not.


Globber also sent us a helmet to use with the scooter. It's the first helmet she's ever used and I thought it might be tricky getting her to wear it, but it has a simple magnetic catch lock which makes it really quick and easy to get on, she can even do it herself {when she has the helmet around the right way}. It also has a dial fit system allowing the band to be tightened easier for the perfect fit. It's so much easier than normal helmets which buckle together and can catch skin if you have them on too tight {yes that happened to me as a child and I was always scared putting them on}. The helmet has also been a great way to teach her about safety when riding her scooter, especially on concrete. We've implemented a no helmet no ride policy and now she always makes sure she has her helmet on before we take the scooter out. In fact she usually reminds us to grab her helmet before she grabs her scooter.


I'm not sure if it's because she's taller, older and more carefree, or because she felt more confident wearing a helmet, but either way she mastered riding her new scooter really easily. She didn't get disheartened or scared when she slipped off the first few times, if anything it actually made her even more determined to succeed. She persisted, wanting us only to watch and not help her, and after a really short time was confident enough to ride the scooter on both concrete and grass. Being able to do it herself has made her much more independent and confident in her abilities and she's constantly riding it around the backyard on her own or begging us to take her outside to ride around the neighbourhood with her. An added bonus from her wanting to ride the scooter all the time is that we're all getting more time outside in the fresh air and we're getting incidental exercise as we follow her around the local paths.


Our favourite features of the MyFREE Fold UP scooter


Easy to assemble and adjust
Like all Globber scooters the MyFREE Fold Up is really easy to assemble, it's literally a case of clicking pieces together. The handlebar is also adjustable to 3 different heights as your child grows by simply clicking the bar in and out as needed.

Easy to store
One of the best features of the MyFREE Fold Up is that the handlebar can be folded down flat against the base board with a click of the button. This allows the scooter to be easily stored under a bed, on a shelf or lent flat against a wall. It also makes them really easy to transport in the back of a car {especially if you already have a pram in the boot}.

Easy to ride
The MyFREE Fold UP is a 3 wheel scooter and low to the ground making it easy for younger kids to balance and control. It also has an optional steering lock. 

Safety features
The steering lock allows the scooter to switch between assisted steering and only going straight which is great while kids are still getting used to it. There's also a long covered rear brake making it easier for kids to brake themselves {although mine still prefers to just put her foot out to stop it, but I'm sure she'll master the brake eventually}.


Thanks to the team at Globber I have one MyFREE Fold UP scooter {RRP $180} to give away to one lucky reader. To enter just leave me a comment below letting me know why you'd love to win a MyFREE Fold UP scooter and complete the steps in the rafflecopter form {so I can contact you if you win}, it's that simple!

If you're having any issues leaving a comment {sometimes it can be a bit temperamental} shoot me an email or send me a message on my Facebook page and I can help you out.

Toni x

*Please note unfortunately the prize scooter doesn't come with LED wheels, sorry guys!*

a Rafflecopter giveaway


TERMS & CONDITIONS 
Competition commences upon publication and ends at 11:59pm August 24th 2017. One winner will receive a MyFREE Fold UP scooter from Globber RRP $180.00. Winner can choose their preferred colour from the options available once the competition has ended. Finding Myself Young will not be held liable should the prize be lost in transit. Competition is open to Australian residents only, excluding ACT. This competition is a game of skill and will be judged as such. All mandatory entry steps must be completed to constitute a valid entry. Incomplete entries will be deemed invalid and excluded from judging. Winner will have 72hrs to respond or prize will be redrawn. This competition is in no way endorsed, promoted or administered by Facebook.

Disclosure - We were gifted a Globber MyFREE Fold UP scooter and helmet for the purpose of review. All opinions are expressed based on our experience using the scooter. I did not receive payment for this review.

Tuesday, February 14, 2017

Mummy Must Have Review | My Creative Box

Before I had kids I never thought I'd be a crafty mum. I loved art as a kid myself, but for some reason I could never imagine myself sitting down and doing craft activities with my child. Most likely because I thought I wouldn't have the patience for it. Evidently I was wrong. So wrong.

Turns out I love doing craft activities with her. Granted my ocd does get tested a fair bit when she's decorating or making things, and so does my tendency to want to control everything, but that's the beauty of being a parent ~ you adapt and change, and if not look in the other direction to stop yourself from "fixing" everything. As much as her doing things differently to the way I envisaged does test me, I really love watching her imagination come to life as she creates and I love that we get to share that together. For this reason we usually do a craft type activity at least once a week, whether that be drawing, painting, something more elaborate like making pom pom monsters or something themed like making Christmas wreaths.

Even though I love doing craft and am always looking up new things we can do together, there are times where I just lack motivation or enthusiasm to come up with new ideas {or trawl through pinterest for inspiration}, especially now that I'm seven months pregnant. There's also lots of nights where I don't want to spend ages prepping activities for the next day. Unfortunately though her desire to do activities never wanes, so I have to come up with alternatives, which is why I'm so glad I came across My Creative Box on Instagram.

My Creative Box is a monthly art/craft activity box which can be purchased as a one off box or via a subscription. It's the brain child of two childhood educator mums, Leanne and Abby, who wanted to bring fun, creative learning activities to other children. As educators they realise the many learning and development benefits of children being able to express themselves creatively, but they also understand that lots of parents are time poor so organising art activities can be a challenge, so they've done all the work for you. Each My Creative Box is designed for preschool children {3-6yrs} and includes 4-6 different craft activities each month. The activities included in the boxes are designed to encourage children to develop fine motor skills, hand/eye co-ordination, cognitive skills, build confidence and express their creativity through multi-sensory experiences. We've been working our way through the activities in the February My Creative Box over the last fortnight and this is what we think.
My creative box monthly art and craft activity kit

My Creative Box is literally packed with activities and I love that there's a guide page attached inside so you can see all the activities easily, which helps with choosing which one to do first {although if your child is like mine they'll want to do that one and that one AND that one first}. I also really love that everything you need for each activity is included {literally everything right down to the glue or paintbrush for example} and they're all packaged into separate bags for each individual activity. It's so easy to grab out a bag and set up an activity in less than a minute. No prep, no gathering of materials, it's all done already. 
My creative box February contents

Each activity comes with a comprehensive guide card which lists how to complete the activity step by step including photos. There are also extension activities listed at the bottom as some of the items can be re-used again and there's also usually excess materials {such as paint} left over once the specific activity is completed. On the back of the guide card the girls have also listed all the skills the activities help your child develop {like fine motor skills such as hand strengthening, pincer grip etc} and there is also suggested prompts to use when doing the activity to aid in language development too. The aspiring childhood educator in me loves this addition.
paper plate beach craft idea for toddlers

One of her favourite activities included in the February box was this sea plate craft activity. She loved gluing down each of the pieces of the blue tissue paper and choosing where each one would go to make the ocean. I then sprinkled the sand onto the bottom of the plate and she placed all the shells and fish where she wanted them to go. We didn't glue those down because I wanted to keep the plate as a more fluid kind of small world scene that she could change up each time she wanted to play with it. She kept moving the fish and crab around making them talk to each other and moved the shells around to make imprints into the sand.
beach sensory paper plate craft from my creative box


Being the February box it also included some fun valentines day crafts to make homemade presents. She loved putting these together, especially the clay heart necklace which she straight away told me was for grandma. Why do the grandparents always get the good stuff? Every single time we make a necklace, pretty picture, painting etc she always wants to give it to grandma. What about mummy? I'm the one who puts in all the effort, haha I'm totally not jealous at all! Luckily for me there was enough clay to make a few hearts so I got her to paint another one I'm keeping for myself.


Her most favourite activity of all was decorating her very own library bag. To be honest I think she was just as excited to paint all over a bag {because she thought she was getting away with something naughty} as she was with actually being able to paint it any way she liked. This activity did test my own ocd a bit because my brain wanted her to draw a nice pretty picture, but I knew it would end up being a bunch of random colours and lines. I managed to control myself though and allowed her to decorate it however she wanted and it was actually really amazing talking to her about what each squiggle was. She drew rainbows, mountains "like da pyramids" and one blue squiggle is apparently Sonic the hedgehog. Kids imaginations really are the best.


We've really enjoyed doing all the activities included in this month's box and I love that she also practised so many development skills while creating all her little crafts. The activities definitely helped to improve her hand strengthening as she can now squeeze a glue bottle without needing my help {which may bite me in the butt later if I leave her unattended with glue, but at the moment I'm just super proud of her}. To see all of our finished activities from the box check out my Instagram feed.

It's evident that Leanne and Abby have put a lot of time and planning into curating My Creative Box so that the activities appeal to a range of children and each activity {although comprehensive instructions are included} has a wide scope of how it can be completed given each child's imagination and individual way of manipulating the materials provided. I really love that each activity is so easy to set up and everything is provided so all you need to do is help your child to create a little masterpiece. They're great for rainy days, hot days when it's too hot to go outside, time poor parents who want easy no fuss activities and also crafty kids who love to create. I've already ordered the March box because she loved this one so much and I'm pretty sure we'll be ordering more in future months so that she has something just for her once her little sister has come along. I'm certain I'll need help coming up with creative ideas when I'm knee deep in sleep deprivation again, so I'm glad I have this special craft box {as she calls it} up my sleeve to keep her entertained.

Do/did you enjoy crafting with your kids?

Toni x

Disclosure - I was provided the February My Creative Box for the purpose of review. All opinions expressed are based on our experience with the items and activities included in the box. I did not receive payment for this review and have already ordered the March box because we had so much fun doing the activities from this month's box.

Linking with Kylie.
Friday, November 4, 2016

Twinkl teaching resources

I'm not sure if I've shared on here before, but I'm planning on studying early childhood education once bub's gone to school, with the plan to work in childcare and possibly teach kindy. I wanted to work in childcare back in my early 20's but knowing I had fertility issues I chose not to because I thought being around little kids all day would just make me long for my own even more. Looking back I think that was the right decision because just seeing babies would make me sad for what I was missing, so I can imagine how much pain I would've been in being surrounded by children day in and day out. However, my desire to work with children has never waned, if anything it's gotten stronger since becoming a mum. Needless to say we do a lot of learning through play activities at home so I can indulge my passion and she loves it.

I share most of our activities over on Instagram, which has earned me the nickname pinterest mum from some of my friends. Ironically I hardly ever use pinterest, instead I either think up our activities myself or am inspired by other teachers and homeschooling mums I follow on Instagram. We do a lot of sensory play and small world activities as well as working on the alphabet and counting. I've started adding printables and activity sheets lately to mix things up and keep it interesting for her. One great resource I've discovered for these is Twinkl.


Twinkl is a comprehensive teaching resource site providing teaching, planning and assessment materials for babies right through to school aged children. The twinkl resources include lesson packs, power point presentations, display materials, worksheets and craft ideas. Twinkl is originally UK based, but an Australian curriculum section has been added to support Australian teachers and homeschooling families. In addition to this there is also a create section where you can create your own resources based on various templates. There are also heaps of resources for parents and child minders to use at home.

For the last few weeks I've been feverishly trawling the birth-twos section of the parent resources and downloading anything I know bub will be remotely interested in. There are so many different resources available including games, busy bags, sensory bin ideas, sensory recipes {playdough, cloud dough, slime etc}, puzzles, playdough mats, phonics cards and can you find posters. Needless to say I've also bought a laminator and been going to town printing and laminating all the things {seriously where has this magical machine been all my life}. Bub's been a huge fan of the phonics cards and can you find it posters. She's been using glass pebbles to find the items on the posters so we can reuse them and she even cheers herself at the end saying "yay I did it mummy, I did it".


There are also numerous themed resources designed to help teach certain story books, such as the Gruffalo {see the image above for just a tiny selection of Gruffalo resources}, The Very Hungry Caterpillar, Jack and the Beanstalk and Room on the Broom, just to name a few. We've printed out a heap of Gruffalo themed resources as bub loves the movie and the book. There's also resources themed around seasons and special holidays and events. We printed out the Halloween phonics cards {below} and I've downloaded heaps of Christmas activities which I'll share on Instagram as we do them.


There are so many other resources I've downloaded to try later on including dot-to-dot sheets, colouring sheets, letter formation worksheets, number formation worksheets, pencil control activities and a heap of other playdough mats. Bub has show a keen interest in learning how to write letters and numbers so we'll be working on playdough mats and formation sheets to help with that soon. I've only really scratched the surface with the resources available on the site though, every time I go on I find other cool things to download, now it's just a matter of finding enough hours in the day to do all the cool activities.

If you're a teacher or early childhood educator I would definitely recommend Twinkl as there are so many resources for the classroom. It's also just as beneficial for stay at home parents, homeschooling families and nannies as there are numerous activities that can be done at home, especially for younger children. Twinkl offers a range of free resources {simply sign up for a free account}, or there are paid subscription options which give you access to all resources on the site. We've been using the paid subscription and will continue using it as it's definitely value for money and there are so many more activities that will become relevant as bub's abilities continue to develop and once she starts school. There's also the Twinkl Facebook page and a special Twinkl Australia Facebook group for even more inspiration and ideas.

Toni x

Disclosure - I was gifted a premium subscription to Twinkl to access all resources in order to provide a review. All opinions expressed are based on our experiences with the website and printable resources. I did not receive payment for this review.