
Are your kids obsessed with anything squishy like mine? If they love Squishmallows, stress balls, fidget toys and other squishies then they'll love being able to make their very own squishy at home with the new Dr Squish Squishy Maker.

My 9yr old has always been a big sensory seeker from a young age, so as soon as I heard about the Dr Squish Squishy Maker I knew it'd be perfect for her. She's always loved playing with playdough and slime and is constantly begging me to buy her those squishy ball things at the shops.
As much as I'm scared of them popping and creating mess, I can also see the many developmental benefits they have like improving her fine motor skills, helping her self regulate her emotions and giving her tactile sensory input. So yes, I'm the mum who embraces the squishies, so of course we had to give the Squishy Maker a go at home.
DR SQUISH SQUISHY MAKER
So what exactly is the Dr Squish Squishy Maker?
If your kids love squishies and watch YouTube then they've probably already heard of Dr Squish. She has super popular YouTube and Tik Tok channels and, as her name suggests, she's obsessed with everything squishy. She's been making and investigating squishies for years, so it only makes sense that she would create her own squishy maker that kids can use at home to be just like her.
The Squishy Maker comes with everything you'll need to create 6 of your own squishies, including 2 latex balloons, 4 clear balloons, confetti, glitter, colouring, special squishy powder, clip seals and ribbon. All you need to do is pump it, fill it then squish it! And there's refill kits available if you want to make more.
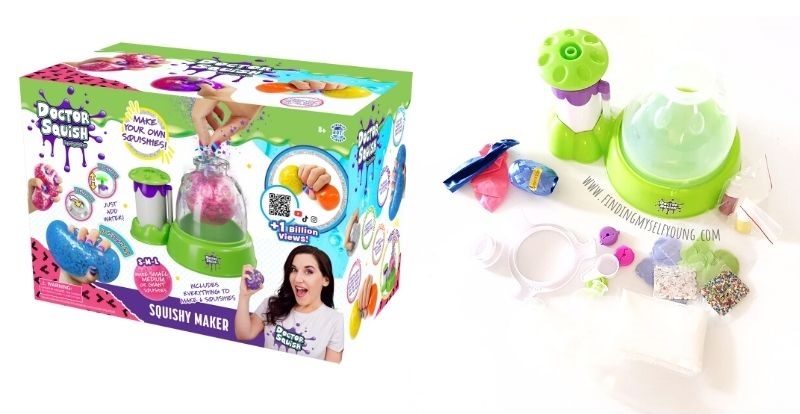
We prefer using the clear balloons because we like making colourful sparkly squishies and it's so fun watching the colour and glitter bulge out as you squish it. The coloured latex balloons are a great way to make squishies similar to a stress ball and would be fun to fill with playdough too.
HOW TO MAKE A SQUISHY AT HOME
The Squishy Maker is hands down the easiest way for kids to create their own squishies at home, because it comes with everything you need to fill and assemble a squishy and you can make them in just a few minutes. It's recommended for children over 8 years old and they will need some adult assistance and supervision, but once you get the hang of it it's really easy to use.
You can also add in other fun items like orbeez, glitter, foam beads, slime and sequins you have at home once you get confident making squishies.
Tips for using the squishy maker
- Practice inflating and making a squishy with just the empty balloon first so you get confident pumping them up and clipping them correctly.
- Try making the smallest squishy size first before moving onto larger sizes.
- Make sure the outer dome case is clicked in properly before inflating the balloon. Turn it counter clockwise then back clockwise until it's locked.
- Don't use any sharp add ins or pointy sequins that may damage the balloon when squished.
- Do not stir the squishy mixture with a metal spoon. If you want to stir it use a plastic or silicone spoon so the balloon won't get accidentally damaged.
- Always use the machine with adult supervision.
- Do not play with squishies on carpet, always use them on hard surfaces in case they break.
Watch us make our own squishy with the Squishy Maker in the video. It is a bit amateur because it was mainly filmed by my 9yr old, however you can see just how easy the process is. There's also step by step instructions below.
How to use the Dr Squish Squishy Maker
1. Place the support inside the squishy maker. Small facing up if you want to make the small size, or upside down if you want to make a medium squishy. If you want to make a large one you won't need the support. I strongly recommend you make a small one first until you're confident using the machine.
2. Twist the dome cover counter clockwise until you feel it drop down slightly, then twist it back clockwise until it's locked.
3. Place the squishy balloon into the machine by pulling the neck over the opening of the dome.
4. Pump the squishy maker until the balloon is inflated to the size you need.
5. Add the squishy powder. One scoop for the small size, one and a half for medium or two for large.

6. Put any other add ins you want into the balloon {optional}. This can include glitter, small foam beads, orbeez etc {just nothing that has sharp edges}. We added some translucent glitter to ours but it's hard to see in the photos.
7. Squirt in a few drops of your desired colouring {optional}.

8. Fill the squishy balloon with water. Make sure to stop as soon as the water reaches the bottom of the balloon neck. The water and squishy powder will react to create a jelly substance with a similar consistency to Gelli Baff.
9. Place the stopper on top of the balloon and roll the edges of the balloon onto the stopper.
10. Remove the dome and take the squishy balloon from the squishy maker.
11. Twist the top of the balloon while the stopper is still attached and add a clip directly under the stopper.

12. Carefully roll the lip of the balloon off of the stopper. It's much easier to do with two hands when you're not filming a video.

13. Tie a piece of ribbon above the top of the squishy clip {optional}. Do not remove the squishy clip as the ribbon will not adequately hold it closed by itself. We just added it as an additional safety net.

IS THE DR SQUISH SQUISHY MAKER WORTH IT?
Firstly I will say you definitely want to stick with the recommended age limit of above 8yrs old because younger children physically won't be able to make the squishy. I had to assist in making ours and my daughter is 9 1/2. It is quite easy for adults though, but my 5yr old definitely wouldn't have the patience or dexterity needed to make one.
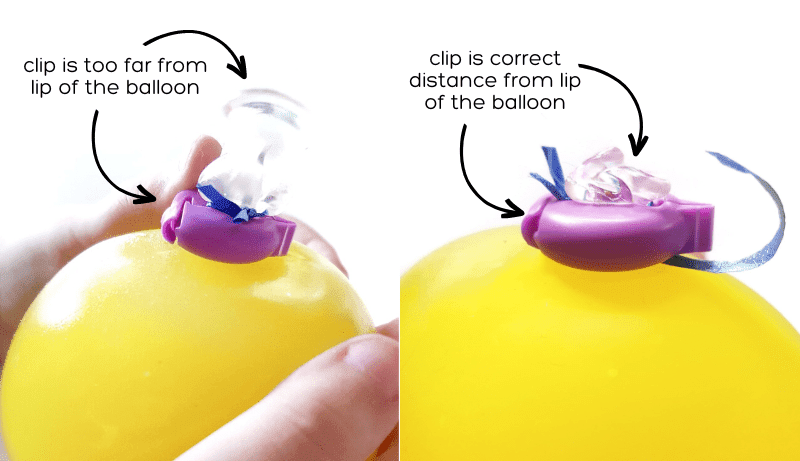
Also take note of my tips for using the machine. It's definitely easier once you've had a practice and get comfortable using the balloons, stopper and clips. We did have one clip that popped open, however we caught it straight away and managed to reseal it before anything leaked.
The problem with that squishy was we put the clip on too far down, it should've been closer to the edge of the balloon neck. Once we changed that we've had no other problems and have played with squishies for over 2 weeks and they're still fine.
If you follow all the instructions and tips then you shouldn't have a problem making squishies. Dr Squish has also made this great troubleshooting video which addresses concerns some customers have had.
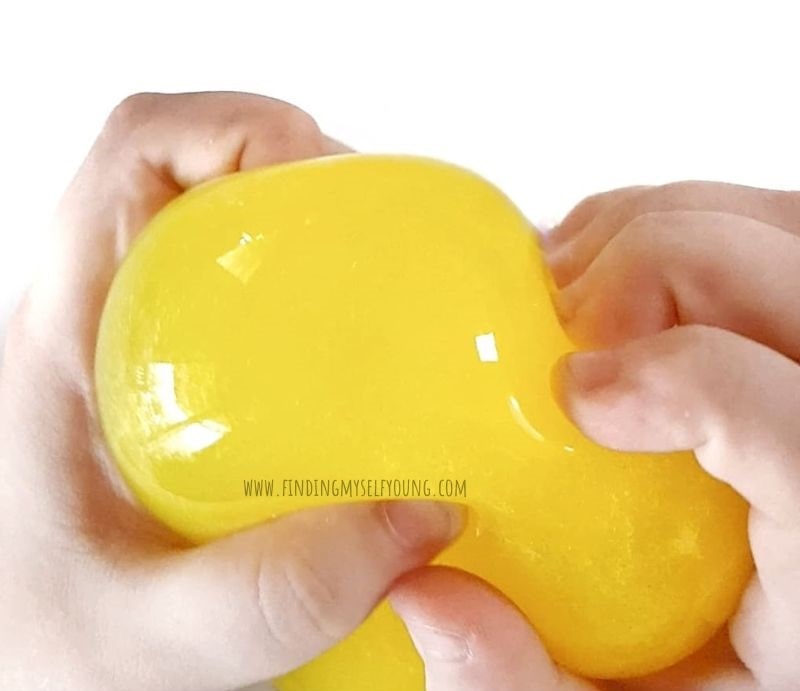
As you can see from our photos and video my 9yr old has loved making squishies and playing with them. I definitely think it's a worthwhile investment for an older child who has the patience to follow instructions and knows not to be too rough.
Using the squishy maker has been a great way for my daughter to follow a procedure while doing something fun. It also lets her be creative and make her own sensory resources. And she loves that she can make her own squishies with whatever colour and add ins she wants.

WHERE TO BUY THE DR SQUISH SQUISHY MAKER
Disclosure - This post contains some affiliate links for your convenience, which means that I may make a small commission at no cost to you, should you make a purchase. We were kindly gifted a Dr Squish Squishy Maker from Jasnor Australia.


