This blog post may contain affiliate links.
aff
Showing posts with label aff. Show all posts
Friday, August 7, 2020

Turtle Life Cycle Small World Play Tray

This sea turtle small world is a great hands on way to teach turtle life cycles to young children and is also a fun sensory experience exploring the texture and feel of sand and water. It's a fun way to explore science either in the classroom, or at home.
turtle life cycle small world invitation to play in a tray

Some children learn best by reading information, however my children definitely learn best hands on through play, so I introduced the life cycle of a turtle using a small world play tray with animal figurines. 

I find my children definitely learn and absorb so much information by being able to touch and manipulate figurines while playing. They're also big sensory seekers so anything with a sensory element is a big win, which is why we love small world play so much!
Saturday, February 29, 2020

Animal Habitat Playdough Sort and Rescue Activity

Playdough is one of my favourite sensory materials to use with kids {and not going to lie, I love to play with it myself}. It's such a wonderful sensory experience {and fine motor workout} squishing, rolling, squeezing and splatting playdough between your fingers. Apart from it's tactile benefits, it can also be used in a number of educational ways to teach children other skills. 

I created this 
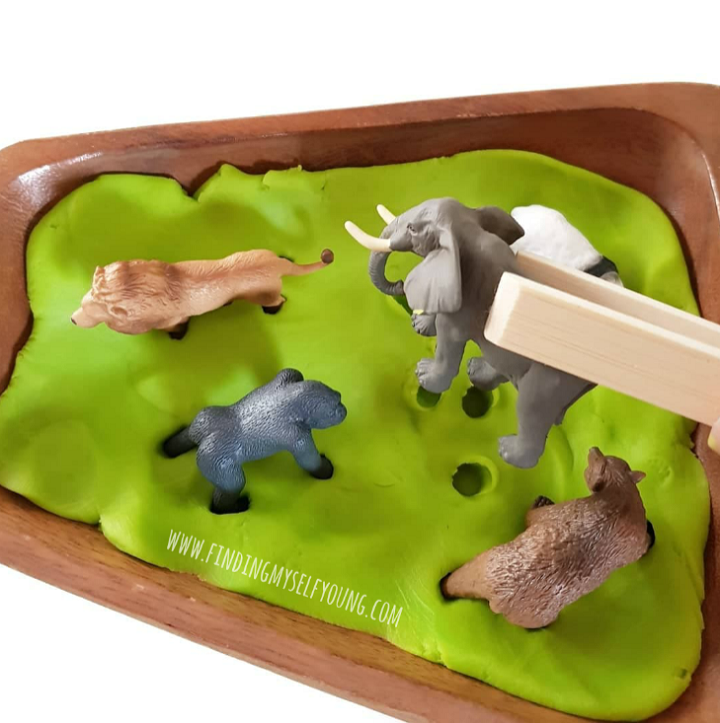
animal habitat sort and rescue activity for my daughter using playdough and animal figurines. One quick and easy to set up activity provided so many different learning opportunities and then she even extended on it herself.


ANIMAL HABITAT PLAYDOUGH SORT AND RESCUE INVITATION TO PLAY


< Please note this activity is not recommended for children under 3 as some items may pose a choking risk. Full adult supervision is required >


LEARNING OPPORTUNITIES

- Colour recognition
- Animal names & habitats
- Categorising {by habitat}
- Hand/eye coordination
- Hand strengthening
- Problem solving
- Pincer grip


*This post contains some affiliate links*


WHAT YOU WILL NEED

- Mini animal figurines
- Playdough {blue & green}
- Wooden tray {2 compartments}
- Tongs or plastic tweezers

I set up the habitat sorting activity in a two compartment monkey pod tray so that there would be one side for the land animals and one side for the sea animals. Having blue playdough in one side and green playdough in the other makes it really easy for kids to visually differentiate between the two different habitats. 

I have a huge collection of monkey pod trays I've thrifted, so I pretty much have a tray for every activity, but any two compartment tray would work fine for this invitation to play.

For the animals I used some of our mini wild animals and some of our mini sea animals. Our animal figurines are CollectA brand, but you can also get similar mini figurines from Wild Republic and Safari toobs. I added some wooden tongs for some fine motor practice, you can usually find these at thrift stores, dollar stores or online at Amazon for a few dollars {plastic tweezers are also a great alternative}.


When I first set up this activity it was as an animal rescue activity to practice her fine motor skills, so I set it up with the animals already stuck in the playdough, instead of making her sort them to begin with. I deliberately put land animals on the green playdough and sea animals on the blue playdough for some added categorisation, but didn't mention it to her because I wanted to see how she'd naturally interact with it. 

My only "rule" for the activity was that she had to use the tongs to remove the animals not her fingers {which she loves doing anyway, she even went and got a second bigger pair of wooden tongs to add to my set up}.


She rescued the animals from the playdough and then studied the footprints and imprints left in the dough. She repeatedly put the animals back into the playdough {on the correct habitat colours} and rescued them for about five minutes. She then asked me to play with her and created new games for me to play.

She put the animals in the playdough and deliberately mixed them up in the wrong habitat and told me I had to rescue them and put them in the right habitat. Then she did it again but put some of them in the right sides and some in the wrong habitat and told me I had to rescue the ones in the wrong habitat {I love that she tried to trick me and had no idea she was actually reinforcing her own learning}. 

After that she took all the animals out and told me I had to put them all back in, but I had to use tongs to push them into the playdough, no fingers allowed {like a reverse of what she did}.


I seriously love how she extended on the original activity and then tried to teach and quiz me! When the student becomes the teacher as they say. This was such a great activity for the learning opportunities mentioned above, but also because of the quality time we spent together bonding over a shared interest. If you click on the Instagram post below you can go through to the videos at the end to watch part of our play. 


Disclosure - This post contains some affiliate links which means I may earn a small commission, at no extra cost to you, should you make a purchase.
Wednesday, February 26, 2020

Chicken Playdough Tray Invitation to Play

One of my favourite activities to do with younger kids is a playdough tray invitation to play. They're one of the first activities I set up with my girls from a young age and they're so much fun to do together. I love that they combine loose parts with sensory play, so they get heaps of sensory input with lots of opportunities to work on their fine motor skills. I love setting up themed playdough trays and seeing what the girls come up with. The fun part is they could play with the same items over and over, and each time they'll come up with different results.

This invitation to build a playdough chicken is great as an Easter craft activity, but also great for any time of the year. We made these after my daughter's kindy kept live chickens for a few weeks so the kids could learn how chickens hatched and watch them grow. There was lots of pleading for us to get our own chickens during those weeks, but we can't have real ones at our place, so we made some playdough ones instead. 

This would also be a great classroom activity for preps or kindy students to do while learning about farm animals, studying the chicken life cycle or in the lead up to Easter {even though the Easter bunny gets all the credit for the eggs at Easter}.

*This post contains some affiliate links*

<< Please note this activity is intended to be done under strict adult supervision >>

WHAT YOU WILL NEED


- A monkey pod tray or dip tray
- Yellow or orange playdough
- Craft feathers
- Googly eyes
- Acrylic gems
- Mini nests
- Mini eggs


I set our playdough tray up in my favourite monkey pod dip tray because it's the perfect shape to have playdough in the middle and the loose parts separated around the outside. Our monkey pod tray was a lucky op shop find, but you can find a similar wooden compartment tray online here. You could also use a plastic dip tray which can be found at most supermarkets and dollar stores, however they will crack over time. 

When we made these playdough chickens we used orange playdough and yellow gems, because that's what we had on hand at the time, however I would of preferred to use yellow playdough and orange gems {for the beak} to make them look more realistic. Playdough, acrylic gems, googly eyes and craft feathers are relatively easy to track down at dollar stores all year round. Mini nests and mini foam eggs are usually available at dollar stores in the lead up to Easter {I just buy in bulk so I always have some}, however they're available year round online from Etsy or Amazon.


The best part about a tinker tray style playdough invitation to play is that although there's generally a goal, in this case to build a chicken, there's no right or wrong way for kids to reach that end goal. In fact they don't even have to do what we as adults intended the activity to be. I like to think of tinker trays as the process art version of the play world, because it's more about the fun had throughout the process of playing rather than the outcome. This activity could also easily be turned into a bookish play idea by reading That's Not My Chick before playing.


We played alongside each other building our own chickens and although we started with exactly the same materials, we ended up making completely different chickens. I was really surprised because I thought she would naturally build a 3D chicken like I did, but then she made a 2D version. Even though I nicknamed it roadkill chicken {not out loud}, I actually kind of love it, because it's just another reminder of how kids see the world differently to adults.


Disclosure - this post contains some affiliate links which means I may earn a small commission, at no extra cost to you, should you make a purchase.
Friday, January 24, 2020

DIY heart wall hanging

We have a wall in our living room that is known as the craft wall because we use it to show off all of the craft, paintings, drawings etc that the girls have made. We usually theme the display and add to it as they make more pieces and then change it over when a new holiday comes along. It was recently full of Christmas drawings and paintings and now we're switching it over to a Valentines display. Usually it's only filled with the girls masterpieces, there's never a shortage of fabulous artwork to hang because they create something nearly every day, however this time I decided I'd get my crafty mum hat on and make a heart wall hanging myself. I did it in secret at night while they were asleep so it was a surprise and my 2yr old now tells me every morning wow mummy look that you made it pretty as soon as we walk downstairs. I think I might move it into their bedroom once we take down our Valentines craft wall.

It was super simple to make and can be used as room decor, a valentines gift, or just for display. It can also be made by preschoolers pretty easily if you sub out the hot glue for sticky tape. The best part about this heart wall hanging is it was completely free!


*This post contains some affiliate links*


WHAT YOU WILL NEED TO MAKE A HEART WALL HANGING


- A thin branch
- Paint chip cards
- Bakers twine or jute string
- Heart cookie cutter
- Hot glue gun
- Scissors
- Pen


When I decided to create a heart wall hanging I simply looked through my crafting stash to see what we already had at home. I came up with the design based on the materials we had on hand, so this craft didn't actually cost me anything to make, except time. If you don't have everything on hand though you can get most of it for free or relatively cheap.


The girls love to collect sticks and small branches every time we go outside so I had a collection readily available, but if you don't have any a quick walk to the local park is all you need to find the perfect branch. I chose ours because it was thin, so not too heavy, and I liked its character. Plus the small twig ends sticking out provided a good anchor point for the string.

To make the hearts themselves I used some red and pink paint chip cards I already had. If you don't have any take a trip to Bunnings, or your local hardware store and you should be able to get them for free in the paint aisle. The girls always take some each time we go because they're such a great resource and there are so many cool paint chip crafts, we'll never run out of ways to use them. You can always use coloured cardstock for the hearts as well if you don't have any paint chip cards available. Hot glue guns can be found relatively cheap at local dollar stores and craft shops or online at Etsy or Catch {AU}.


HOW TO MAKE A HEART WALL HANGING


1. Use a heart shaped cookie cutter or playdough mould to trace heart shapes on the back of the paint chip cards. I did this on the back so the pen lines wouldn't be visible on the coloured side of the finished product. Try to fit as many hearts as you can onto each paint card. Mine were square cards and I managed to fit 6 hearts onto each one.


2. Carefully cut out all the hearts with scissors.


3. Cut 3 similar size pieces of jute string. Tie them individually onto the branch. They can be tied in any position you like, I just evenly spaced ours out. Don't worry if they don't end up hanging at the same length once the knots are tied {it just makes it look more rustic}. If you don't have jute string you could also use bakers twine, fishing line or any string/ribbon you already have.


4. Turn the hanging over to attach the hearts to the string. Remember it's now backwards when you're attaching the hearts if you had a specific colour order in mind. Attach the hearts one at a time by placing the heart upside down so you can't see the coloured side. Apply some hot glue to the heart and then hold the string into the glue until it's dried. Attach each heart in this way to various spaces on the string. I chose to do ours in colour order from dark to light and spaced them at similar heights across each string. It could also be done with the colours all mixed up, haphazardly spaced, or even colour patterned. The design is completely up to you. If you have younger children and they want to help assemble the hanging you can always use tape to attach the hearts instead of hot glue.

5. Once the glue is all dried attach another piece of string to either end of the branch so it can hang to the wall.


Disclosure - This post contains some affiliate links which means I may earn a small commission, at no extra cost to you, should you make a purchase.