
Kids are naturally curious about the world around them and how things work and you can capitalise on that curiosity by doing these easy science experiments at home. There are many fun, safe, engaging and simple ways to teach science to children even from a young age.
The experiments in this post are all great for toddlers, preschoolers and school age children and provide lots of exciting and interesting ways to introduce chemistry and physics concepts and spark a love of all things science. There's experiments that explore chemical reactions, density, absorption, how to grow crystals and even glow in the dark science experiments.
The best part is most of the science experiments can be done using basic household items you probably have in your kitchen right now. They can also be done in a classroom as part of a science unit.

Basic household supplies for science experiments
To make fun kids science experiments at home or in the classroom you'll need a few basic supplies on hand. Luckily most of these science experiments can be done with similar ingredients and pantry staples. For most you'll need a mixture of:
- Salt
- Water
- Food colouring
- Baking soda
- White vinegar
- Dishwashing liquid
You might also need:
- Bowls
- Cups {or glasses}
- Ziplock bags
- Q-tips
- Paper towels
- Pipettes.
KIDS SCIENCE EXPERIMENTS USING CHEMICAL REACTIONS
A chemical reaction is when two substances are converted into one or more other substances. During a chemical reaction the atoms are rearranged to create different substances. Chemical reactions can sound complicated and even dangerous, as most people immediately think of explosions, however there are many fun and safe ways to demonstrate a chemical reaction to kids.
Bicarb & Vinegar Science Experiment

The classic way to demonstrate a chemical reaction to kids is with a bicarb and vinegar reaction. It creates a quick and explosive fizzy reaction, however it reacts to form carbon dioxide and water so is completely harmless. Have a look at how easy it is to create colourful bicarb and vinegar reactions.
Fizzing Colour Sensory Bin

My Bored Toddler have used the same baking soda and vinegar reaction in a different way to create a fun fizzing colour sensory bin. This sensory bin is a great science experiment option for toddlers and younger children as it provides instant gratification and they can explore lots of different colours within the one tub. It also helps children work on their fine motor skills and explore colour mixing.
DIY Lava Lamps

This lava lamp science experiment is a super fun way to turn a chemical reaction into an exciting visual effect. For this experiment you'll need some household items plus an Alka-Seltzer tablet. As the Alka-Seltzer tablet dissolves it causes carbon dioxide bubbles which force the coloured water to the surface then as the gas pops at the surface, the blobs fall back down to the bottom as they're denser than the oil. Follow my instructions here to make your own DIY lava lamps.
Magic Milk Experiment

The magic milk science experiment is a fun way to visually show the chemical reaction between dishwashing liquid and milk fats. It's not as explosive as the other reactions in this post, however the kids will have loads of fun making the food colouring dance across the milk. Read how we did the magic milk experiment.
Snow Volcanos

Snow volcanos are a fun outdoor science experiment if you live in cooler climates. Snow volcanos are another twist on the basic baking soda and vinegar science experiment, with the addition of snow and dishwashing liquid for extra bubbles. Follow the instructions at Messy Little Monster to do this experiment.
Exploding Baggies
Another variation on bicarb and vinegar reactions is exploding bags. The reaction between the bicarb and vinegar will seem more intense in this experiment as the carbon dioxide formed becomes trapped and will quickly expand and pop the bag. Follow the instructions at Inspiration Laboratories to set up the experiment correctly.
GLOW IN THE DARK SCIENCE EXPERIMENTS FOR KIDS
Kids are naturally fascinated by anything that glows, we all are really aren't we? I know I still am. The good news is there's quite a few fun glow in the dark experiments you can easily do at home or in the classroom.
How do you make something glow? The answer is luminescence {phosphorescence specifically for these science experiments} which is how phosphors soak up energy from light sources and then use it to glow in the dark. Now this might sound a bit complicated, but I promise it's not, you'll just need items such as tonic water, a black light or photoluminescent powder.
Glowing Ice Cubes

You can make glow in the dark ice cubes that are still totally edible, by using tonic water. You'll need a black light to make them glow as the quinine in tonic water absorbs UV light and then shines under black light. Read more about this fun sensory science activity at Go Science Kids.
Glow in the dark Lava Lamp

Our lava lamp science experiment is definitely the girls favourite science experiment to date, but I know they'd be even more excited to make a glow in the dark lava lamp. This can be achieved in a few different ways, you'll need either tonic water or photoluminescent pigment. Steam Powered Family has instructions for both versions here.
Glowing Water Beads

Another fun experiment is to make glow in the dark water beads. Now you can buy glow in the dark water beads, but it's even more fun to turn normal water beads into glow in the dark ones. The best part is you only need tonic water and a black light. Follow the instructions at Go Science Kids to make your own.
KIDS SCIENCE EXPERIMENTS THAT GROW CRYSTALS
Crystals form naturally when liquids cool and harden. In nature this can take thousands of years, like when magma from volcanoes cools and hardens to become granite, which encases quartz and other crystals. However, you can grow crystals much quicker with supersaturated solutions, using minerals like salt or borax.
When a supersaturated solution cools or evaporates there are extra molecules that have nowhere to go, so crystals are formed as these molecules attach to each other in an effort to remain stable. The crystal forming science experiments below are easy ways to use supersaturated solutions to make crystals with kids and will only take a few hours to a few days for the crystals to grow.
Salt Crystal Snowflakes

These salt crystal snowflakes are one of the easiest crystal experiments because you only need salt and water to make the crystals. This experiment is also great for fine motor practice as the kids cut out their snowflake shapes. Follow the instructions at Go Science Kids to make your own crystal snowflakes.
Rock Candy

Probably the most popular crystal growing science experiment with kids is growing rock candy, because not only does it make crystals, but you can also eat them after! This one will take a little patience as it can take 5-7 days for the rock candy to grow to a decent size, but it's worth the wait. Follow the instructions at Glue Sticks Blog to grow your own rock candy.
Eggshell Geodes

You can use eggshells and a special borax mixture to create some fabulous eggshell geodes. Follow the instructions at Little Bins Little Hands to make your own geodes with eggshells.
Crystal Flowers

With this crystal flower experiment you can turn fake flowers into something extraordinary by growing real crystals on them. You'll need borax to make the mixture for this experiment too. Follow the instructions at Pink Stripey Socks and after a few hours you'll have some beautiful crystal encrusted flowers.
KIDS SCIENCE EXPERIMENTS THAT DEMONSTRATE DENSITY
Density is a unit of measurement scientists use to determine the mass of an object compared to it's volume. Items that have a high density are usually heavy and compact. This is easy to see in some objects e.g. a brick compared to a balloon. You can also demonstrate density with the following liquid density experiments which are all incredibly easy. Is oil more dense than water? How can you make water more dense? You'll find out in these experiments.
Rainbow Water Density

A really fun way to show different density levels in water is with the sugar water density experiment. By using different amounts of sugar in different coloured water, you can create a rainbow layered effect where the different colours appear to be floating on top of each other. Follow the instructions at My Kids Lick the Bowl to do this experiment at home.
Oil and Water Experiment

One of the easiest density experiments to do with kids is the oil and water experiment. For this experiment you'll only need oil, water, a pipette and a jar. This experiment easily shows children both that oil and water molecules do not mix and that water is more dense than oil. Follow the instructions at Frugal Coupon Living to set up this experiment.
Fireworks in a Jar

Another fun density experiment, which is also great for celebrating New Year's Eve or 4th of July, is fireworks in a jar. To create these fireworks you'll need some oil {we used coconut oil because it's clear}, water and food colouring. The fireworks are created because water is denser than oil so gravity pulls the food colouring down dispersing it through the water like real fireworks. Follow our fireworks in a jar instructions here to set up this experiment.
Rain Cloud Science Experiment
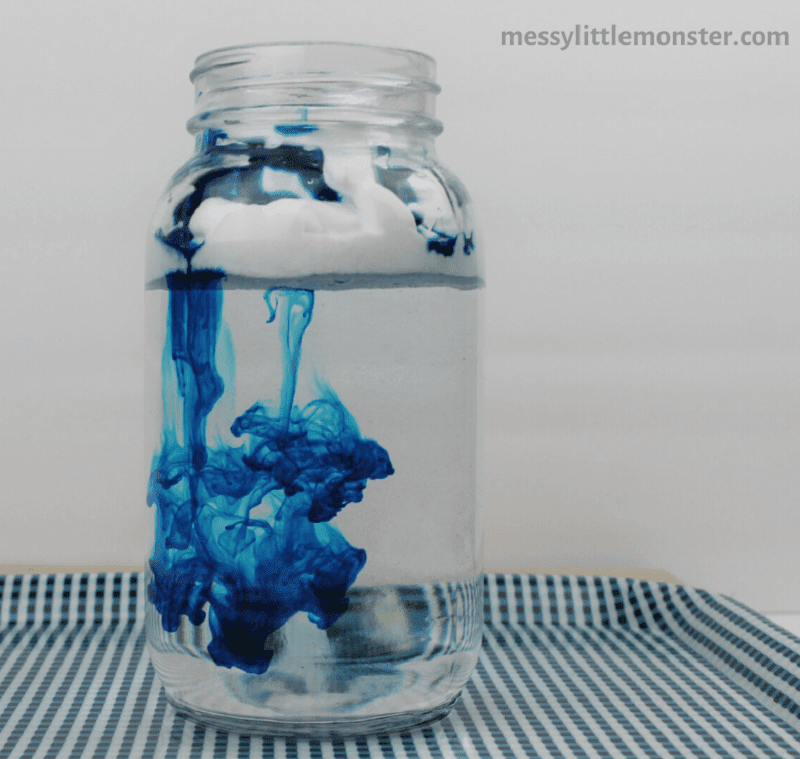
A super simple way to demonstrate the weather is with a rain cloud in a jar. To do this experiment you'll need a jar or glass, water, shaving foam, blue food colouring and a pipette. The shaving foam represents the cloud and the blue food colouring drops are the water crystals dissolving back into liquid. The rain is denser than the cloud so the rain becomes heavier and gravity pulls it down through the cloud. Follow the instructions at Messy Little Monster to do this experiment yourself.
SIMPLE SCIENCE EXPERIMENTS & ACTIVITIES THAT DEMONSTRATE ABSORPTION
Put simply, absorption is the process where one item becomes part of another item. It's an easy concept to witness in everyday actions e.g. when you dry yourself after a bath and the towel soaks the water off your body, or if you spill a liquid and use paper towel to soak it up.
There are however much more fun ways to demonstrate absorption in an interactive way to younger children and school kids. All of the absorption experiments below allow children to visually witness the process of absorption in colourful ways. These activities include some that are instant and others that will take a little while and require a bit of patience over a few days.
Colour Changing Flowers

One of my favourite science experiments I remember doing as a child {and I've done it a few times with my own kids} is the colour changing flowers experiment, and quite frankly it's because I thought it was so magical. It's amazing watching plain white flowers change into completely different colours. This really simple experiment teaches children about absorption and how capillary action works within flowers in a very visual way.
White Gerberas, Roses, Daises and Carnations tend to be the best flowers to use for the colour changing experiment as they result in the most dramatic change as shown above from Taming Little Monsters. This experiment is really quick to set up, however it can take a few hours {sometimes overnight} for the flowers to change colour and the longer you leave them, the more dramatic the results will be. Follow the step by step instructions at Taming Little Monsters to recreate this experiment at home or in the classroom.
Chromatography Flowers

Another fun way to use absorption to create pretty flowers is with this flower chromatography experiment. To create chromatography flower you'll need some white coffee filters, washable markers {in secondary colours}, water and pipe cleaners. The process of chromatography will separate out the colour pigments showing the individual colours that made up the original colour. Follow the instructions at 123 Homeschool 4 Me to create this experiment at home or in the classroom.
Walking Water Science Experiment

Walking water is a classic science experiment that teaches children about absorption as well as how primary colours can combine to create secondary colours. You'll need some jars or cups, paper towel and red, blue and yellow food colouring. Follow the instructions at Messy Little Monster to set up the experiment. Once it's set up you'll see the colours start to absorb into the paper towel immediately, however you may have to wait overnight for the empty jars to fill up with the secondary colours.
Skittles Rainbow Experiment

The Skittles science experiment explains many different science concepts including absorption, diffusion and water stratification. Firstly the Skittles start absorbing the water, then their shell dissolves and diffuses through the water on the plate, and water stratification is the reason why each of the colours don't mix together. Follow our skittles rainbow experiment instructions here to set up the experiment yourself and learn more about the science behind the magic!
Salt Painting

We did fireworks salt painting to celebrate New Year's Eve a few years back and it's a great process art activity that demonstrates absorption. You'll need a pipette, white or clear glue and some food colouring. The salt absorbs the food colouring and dries to form pretty colourful crystallised pictures. Follow our instructions for salt painting to create your own salt artwork.
Colourful Bread

When my eldest was a toddler we did some colourful bread painting. We had seen some rainbow bread advertised somewhere and instead of baking some we decided it would be a fun science activity to make some colourful bread by squeezing food colouring onto the bread with a pipette. We used red, yellow and blue food colouring and experimented with combining the colours to create secondary colours. It was a great fine motor workout and yes she did eat the bread afterwards.
Grow a Rainbow Experiment

Not only can you grow a rainbow with the skittles rainbow experiment, you can also grow one using this paper towel experiment. To grow your rainbow you'll need some paper towel, two cups of water and some washable markers. Follow the instructions at Mombrite to set up your experiment and watch your rainbow start growing in front of your eyes.
Magic Paper Towel Pictures
Magic paper towel pictures are a science experiment and process art activity in one and perfectly demonstrate how absorption works. With some paper towel, washable markers and water, you can make magic pictures appear before the kids eyes. Follow the steps in the video above from Active Littles to make your own magic pictures.
MORE FUN SCIENCE EXPERIMENTS FOR KIDS
If you haven't found the perfect kids science experiment yet, fear not because I have even more. Just like the others, these science experiments are all super easy to set up and have that wow factor to keep the kids interested.
Bouncy Eggs

The girl's loved doing the bouncy egg experiment and creating real eggs that bounce. With just 2 household staple ingredients you can make a bouncy egg in just a few days. The kids will love watching the eggs expand and turn rubbery. Follow our bouncy egg science experiment instructions here to set up the experiment at home or in the classroom.
Water Xylophone

A fun musical science experiment to do with kids is to create a water xylophone using different glasses of water. Using different levels of water in each glass will produce different pitches as the speed of the vibrations through the water will be different. Follow the instructions at Mombrite to set up the experiment.
Tornado in a jar

This tornado in a jar experiment is a fun weather science experiment and a great way to visually show kinetic energy and gravity. To make a tornado in a jar you'll need 2 plastic bottles, water and some duct tape. Follow the instructions at Stir the Wonder to set it up. You can also make this science experiment easier by using a cyclone tube to connect the bottles together properly. This YouTube video from Sick Science shows how the experiment works with a cyclone tube.
Leak Proof Bag Experiment

One particular science experiment that seems to defy logic is the leak proof bag. All you need to do this experiment is a ziplock bag, some water and some pencils. How does the water not leak out of the bag? There's a full explanation of why at 123 Homeschool 4 Me.

MORE SCIENCE EXPERIMENTS FOR KIDS
Disclosure - This post contains some affiliate links for your convenience, which means I may earn a small commission at no cost to you, should you make a purchase.


